Tuesday, December 9, 2008
Old fashioned wooden clothes pins can make quite cute Santa ornaments. Make sure to get the kind pictured below, the kind with the hinges might work, but not quite as well. You’ll need red and white felt, red pipe cleaners, red, black, yellow, and peach paint, acrylic is probably the cheapest and easiest, and glue.
The clothes pins have what looks like legs already, and small torsos, so without even getting started you can imagine how the Santa will look. First glue a one to two inch piece of clothes hanger on each side of the clothes pin. If you have a drill, you can simply drill through the clothes pin and string one longer piece of pipe cleaner through for his arms.
Next, paint everything but the top part, which will be the head, red. After the paint has dried use black paint to paint the bottom sections of his legs black, like boots. Use the black paint to draw a line where his coat would be covering his pants. Draw a black belt around his waist, and draw on two small dots for his eyes. Use the yellow paint to draw a square buckle on his belt. Use the peach to make his cheeks look rosy.
Cut a small rectangle of red felt and roll it into a cone to be used as the Santa hat, then glue it in place. Glue on a bit of white felt for his beard, and use a little more white felt for trim on santa’s hat.
Using a bit of red thread and a needle, sew a loop onto the Santa hat. This will be your ornament hanger.
This blog is brought to you by dialysis nursing jobs.
Thursday, December 4, 2008
Put the mixture you created (see previous blog) into a paper bag along with the orange and roll the orange around inside until it is totally coated in the spices. Leave the orange in the bag in a cool dry place for about a month. Each day roll the orange in the spices again.
The orange may finish curing in as few as three weeks if you live in a very dry climate, and if you live somewhere more humid it may take up to six months. You’ll know your pomander is done when you tap it and hear a hollow sound and the orange feels light in weight. When the pomander reaches this point you’ll want to shake off any extra spices before displaying it in your home.
I find that because you need to remember to roll the orange in the mixture at least every few days for a month or more, it makes sense to make more than one of these at a time, especially since they last for years. You could even make a whole batch and give them away as holiday gifts.
Pomanders look good displayed in pairs in a decorative bowl or on a decorative plate on a bed of cloves or potpourri. If you feel like getting creative, insert the cloves into your pomander in a pattern or add ribbon to your finished product.
If your pomander starts to lose its scent you can simply mix up a batch of spice mixture and re roll the orange in the mixture.
Check back soon for the next part of this blog.
This blog is brought to you by dialysis nursing.
Tuesday, December 2, 2008
Wreaths are commonly used for Christmas decorations. They are usually quick to make, and there is a large variety of types to choose from, many more than I’ll list here.
I think the cutest one is a wreath made with dog bones. You can hang it over your dog’s bed inside and when the season is over, you can give most of it to your dog to eat. Start with a Styrofoam or cardboard shape. Secure a piece of ribbon to it, and then wind it around the circle on a slight diagonal, like stripes on a candy cane. Make sure the ribbon totally covers the cardboard or Styrofoam. Next, you’ll tie the dog bones onto the wreath using more ribbon. Get creative with the types of dog bones you use if you want a more colorful end product. Rubber dog bones come in bright colors, it looks cute to use red and green rubber dog bones. If you want to add more to this wreath tie evergreen sprigs around it also.
This next wreath is very elegant and pretty, it looks almost like light snow gathered into a wreath. You’ll need to form a wire clothes hanger into a circle using some wire cutters and needle nose pliers. Next, you’ll need to tie plastic sandwich bags around the wire using a simple knot. Tie them around until you’ve filled the circle. Add a shimmery bow around the finished wreath.
Check back soon for the next part of this blog.
This blog is brought to you by nephrology jobs.
Monday, December 1, 2008
Now that Thanksgiving has passed it is time to take down your fall decorations and start putting up your Christmas decorations. I’m going to focus on decorations that you can make yourself for a cheap price.
One of the easiest and cheapest decorations is painting bricks to use as bookends or to display on tables throughout the home. This is a fun decoration for kids to do too. All you need are a few bricks, paint, and paintbrushes. Look online for inspiration and ideas of what to paint. Paint a snowman, Santa Clause, or a reindeer on the front of your brick.
Wrap your design around the sides of the brick too if they will be seen where you choose to display them. If you are not very good at painting, you could just paint alternating red and white stripes on a brick, or green with red polka dots, any pattern really. If you want to get more detailed, use some felt or other material to glue onto the brick as clothing for whatever character you painted. It is a good idea to glue felt on the bottom of the bricks so they don’t scratch up the furniture you choose to place them on. These cute bricks can be displayed anywhere by themselves, or in groups. They make wonderful door stops, table decorations, or mantle decorations.
Check back soon for the next part of this blog.
This blog is brought to you by physical therapy jobs.
Tuesday, November 25, 2008
No expensive curios needed. No designer artifacts.
It's the simple things in life that add that sparkle to your home and a smile to your face.
 Yes, I am talking about fresh juicy fruits & colourful fragrant flowers and the magic that they bring into our homes.
 Today I share with you all loads of beautiful moments created by flowers & fruits in my home...
Take out that old brass 'matka' or 'kalsi' and fill it up with seasonal flowers, just a couple of them will do the trick.
 Let your creativity flow, write down happy notes;-)


 Don't have a brass vase, no worry go ahead and use empty glass jars...
 ...or empty wine/beer bottles. The brand lettering adds to the beauty.
 Add some whimsical touches, ceramic ducks picked up from a local fair...

 Don't have a florist nearby, no worries pick up some wildflowers from the roadside or some seasonal flowers from the trees:-)
Wish you all loads of happiness with vitamins and fragrance:-)
Wednesday, November 12, 2008
Since most of us are trying to save money right now, I thought I would post a few do it yourself home decorating projects. These are all inexpensive projects that you can save money doing yourself. Do it yourself projects can end up being a lot of fun too, and the results will be creations you made, so you’ll feel more sentimental about them than if you had simply purchased the work from a store.
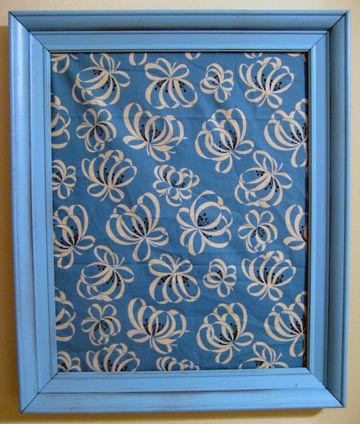
Artwork to adorn your walls with can be quite expensive. Not only are even prints expensive to buy, but they’re even more expensive to frame. Fortunately, there are some creative do it yourself alternatives.
Framing a piece of fabric can look nice. Just use a matting board for a border in a contrasting color. You can make this into a series if you prefer, framing matching fabrics or maybe fabrics that match in texture but differ in color.
Framing dried plants and flowers can look very pretty. Use a colorful mat board to hot glue them to. Another option is to make a colored photocopy of an arrangement of leaves and flowers and frame that.
Take a trip to the thrift store or to a used book store. Find books with pictures you like inside and use them to frame. You can get more creative and make a collage of several if you like. Try adding some text too and spraying over it in a clear coat before framing.
This blog is brought to you by physician staffing.
Friday, October 10, 2008
One of my favorite centerpieces is one that ends up looking like a little pumpkin patch in the center of your table. This one could be used for a Halloween party just as easily as for Thanksgiving. Place a large pumpkin in the center of our table. Set medium and small pumpkins around it randomly. You probably will only need a couple of medium pumpkins and a few small ones, but depending on the size of your table, you may want more or less. Fill in the spaces with fall leaves. Add a few candles in between pumpkins if you want to. You can also add other thanksgiving garden items to the display if you choose, such as squash or apples.
To make a centerpiece that looks like a mini forest use small potted mini evergreen trees. You can get them as small as six inches high. Buy a few in varying sizes. Hot glue moss onto the pots for a really cute look, or if you don’t want to go to the trouble, just place the trees in matching decorative containers if you can find some that will suit. Cover the table in between the trees with fall leaves, mini pumpkins, and candles of any size.

If you want to buy mum plants, ivy, or ferns you can use them for fall season decorating that will be fresh for the whole season. All you need is a large basket or other container to place the mum pots inside. Arrange a couple of ferns or ivy plant pots between the mums inside the basket. Use moss to cover the plastic rims of the pots, or drape some fall colored material between the plants.
This blog is brought to you by locum tenens.
Thursday, October 9, 2008
If you are hosting a Thanksgiving meal at your house this year, here are some ideas to impress them with your table decorating.
A centerpiece on the table will be sure to draw attention from your guests and get you compliments. There are many options you could go with, and some of them are very fast to prepare if you are in a hurry.
A shallow glass tray filled with red cranberries topped with white tea candles can be a pretty centerpiece and it will take you less than five minutes to prepare. Since this decoration is on a tray, you can try displaying it around your home to see where it will look best.
Candlesticks and leaves can be arranged together to be a pretty centerpiece. First, arrange the candlesticks, or pillar candles, down the center of the table. This will look best if it is done on top of a narrow runner placed on the table first, in a color that will enhance the thanksgiving feeling, such as forest green, burgundy, or yellow ochre. Next, arrange fall leaves around the base of each candle. You can also add pinecones or twigs to the display if you would like. If you would rather have a portable decoration, lay fabric on a serving tray and use it for your decorating instead. This would look nice displayed on a coffee table or end table.
A green potted plant with trailing branches can be a great starting point for a centerpiece decoration. Ivy works well for this centerpiece, but other similarly shaped plants can work too. You now need a container in which to place the ivy pot. My favorite for this centerpiece is to use a hollowed out pumpkin, but a basket would work too. Fill any gap between the edge of the pot and the edge of the container with fall leaves, and scatter a few down the table on each side of the container.

Wednesday, September 24, 2008
Repainting cabinet doors can make them look much better. You can also add some simple wood trim to flat cabinet doors to change their style. These are easy fixes that shouldn't take you more than a weekend, and they are also very inexpensive.

Tuesday, September 23, 2008
This is a simple project that will not take long. It will add Fall spirit to your home, and you can use it year after year.

